# ZotDefend Linux Instructions
### ZotDefend Linux Installation (School of Physical Sciences ONLY)
[Trellix HX Agent ](https://tools.ps.uci.edu/downloads/download/IMAGE_HX_AGENT_LINUX_36.21.0.tgz)
Trellix Installation Instructions
The .tgz package (Linux) includes the following files:
HX Client Software (tgz bundle)
1. Agent .rpm files.
2. Agent .deb files.
3. Agent .run file ( xagtSetup\_xx.x.x.run ).
4. Agent configuration file ( agent\_config.json ). It is critical that you import the configuration file following install to insure that the agent
properly communicates with the server.
[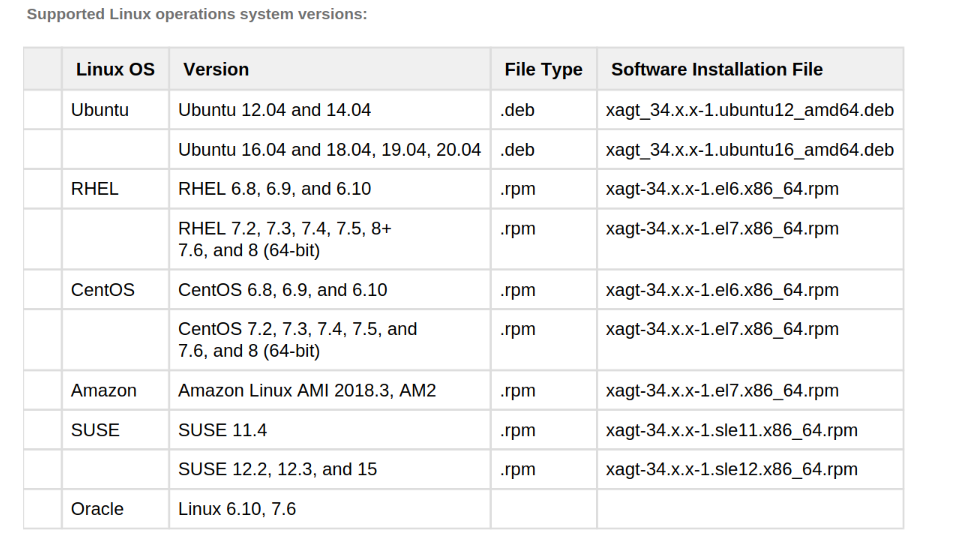](https://knowledge.ps.uci.edu/uploads/images/gallery/2025-04/oDZAXSx7uWgXI0Vu-image.png)
**Example: Installing on Ubuntu OS using .deb file**
```bash
Open a Terminal session on the Linux endpoint that has the agent installation .tgz package.
username@localhost:~/Desktop/FireEyeInstallDirectory$
Use the ls command to verify that the IMAGE_HX_AGENT_LINUX_33.46.0.tgz file has been exists in the install directory.
Use the tar zxf command to unzip and extract the files from the Linux agent
Use the dpkg , medium-level package manager for Debian and the -i option to run the .deb script and install the agent software on your Linux
endpoint. You must have sudo access.
username@localhost:~/Desktop/FireEye$ sudo dpkg -i xagt- .ubuntu12_amd64.deb33.46.0
After the .deb installation script is complete, use the i option to import the agent configuration file from the /opt/fireeye/bin/xagt binary path:
username@localhost:~/Desktop/FireEyeInstallDirectory$ sudo /opt/fireeye/bin/xagt -i agent_config.json
Start the agent services on your Linux endpoint using the following command:
username@localhost:~/Desktop/ FireEyeInstallDirectory$ sudo systemctl enable --now xagt
```
Nessus Tenable Agent Installation Instructions
1. Make sure outbound traffic from port 443 to nessus.oit.uci.edu is allowed through your firewall.
2. Install the Tenable agent with your package manager from the link above.
3. Contact to get the tenable key.
4. Run as root or with sudo: **/opt/nessus\_agent/sbin/**nessuscli agent link --host=nessus.oit.uci.edu --port=443 --key=KEY\_PROVIDED\_BY\_PSCSG
Duo Desktop Agent Installation Instructions
1. Download the appropriate package for your distribution from the above link.
2. Install the package.
3. Enable the service. Eg on systemd distributions, run
```bash
sudo systemctl enable --now duo-desktop
```
4. Check to make sure the duo-desktop service is running. Eg. on systemd distributions, run ```bash
sudo systemctl status duo-desktop
```
5. If you get SELinux erros relating to .NET services, it's most likely Duo Desktop. Create an exception via: ```bash
ausearch -c '.NET TP Worker' --raw | audit2allow -M my-NETTPWorker
semodule -X 300 -i my-NETTPWorker.pp
```